One of our family traditions is decorating graves for MEMORIAL DAY.
Cousins, aunts, uncles, grandparents, grandchildren..we all get together and make bouquets. It’s a process that starts with gathering containers and then surveying yards and collecting greenery and flowers. Often we will buy additional flowers but rarely will we spend money on greenery. For many years our Aunt’s lilac bush provided most of the greenery, but we have used just about anything we could find from wintercreeper to sagebrush and evergreens to grasses. Greenery has an important roll but flowers are where we want to spend our money if we are buying something. If you look around you'll be surprised at what you can find and what will work.
This post was created with Memorial Day coming up and decorating graves in mind (I mentioned it earlier). The principles are BASIC to flower arranging. The steps can help you ENJOY creating your own unique bouquets for many occasions!
STEP 1 - PREP (2 parts)
⇒1 (a) CHOOSE A CONTAINER & add water.

We’ve used recycled juice cans, plastic bottles, glass jars and vases.


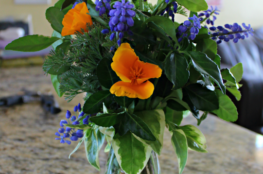
Iris, Poppy, Lilac
⇒1 (b) GATHER flowers and greenery.
Cut the flowers and greens as long as possible. This will make arranging easier. As I said earlier greenery is one thing we don't often buy. I've tried to plant my yard so I have greenery available, but we have used pretty much anything we could find including sage brush.

Lilac, Euonymus, Wintercreeper
STEP 2 -Greenery
It provides the structure for an arrangement. You might call it the skeleton of an arrangement. Literally and figuratively greenery supports the flowers.
This branch had 3 shoots. I cut it so when placed down in the container it is a bit wider than the container at the top. Tension will help hold it in place.
Next I add more greens to give my arrangement shape above the container and structure in the container. All of this will help to hold the flower stems in place.
NOTE: You can add more greens later so don’t think it has to be perfect at this time.


Cut greens to maximize their use. I cut the wintercreeper (left) just above a full spot and left the "Y" intact on the euonymus (right).

STEP 3- Main Flowers
These are your biggest flower. Odd numbers are visually pleasing, so starting with 3 flowers is helpful. (It's a rule that can be broken but if followed can help you get started.) Another idea to get you started is to think of the flowers in terms of the corners of a triangle. Vary the length of the imaginary lines between the flowers. You want the flowers to be closer together as they near the bottom of the arrangement. That will give you more visual weight at the bottom of your arrangement. (This is not the case for a dozen long stem roses.)

Iris are big & carry lots of visual weight.


I cut this iris into 3 pieces. It gave me 3 main flowers with buds which would open later. The top bud had the shortest stem and was used at the base of the arrangement. The longest stem was used at the top.

1st Iris

2nd Iris

3rd Iris
I didn't like right side of the arrangement that had an empty spot which lacked supporting greens. Greenery which stands out because of some characteristic can act like a flower when placed strategically in an arrangement. So the 2 colored euonymus was my choice of greenery. I used it to fill in and bring interest to the arrangement. Here is were I could have call this step done and move on.


Instead I added a 4th iris to the right side to make the arrangement fuller...Not the odd number I mentioned earlier but I wanted a fuller look. It will soon look different as buds open.
STEP 4 - SUPPORTING FLOWERS
You may or may not have these flowers. I didn't use these in this arrangement. The lilac flowers can be considered supporting flowers, but in this arrangement I added them in with the greenery. You will normally have more supporting flowers than your main flowers. Sprinkle these throughout the arrangement. If you have more than one type, add them by size, largest first or fewest amount first. Example: If I have Baby's Breath or something similar I save it for last...It’s usually the smallest flower and normally plentiful. And I like to save a mid-sized flower or two for the end...just in case something needs balanced. This may not always work out but it's an idea to remember.
You could be done RIGHT NOW...
BUT the two last steps are quick & KEY to a professional looking arrangement...AND you might find you already have them covered.