Our family loves STRAWBERRY FREEZER JAM!
We love it on pancakes and waffles with whipped cream, fresh bread, toast, bagels and in Italian ice and smoothies.
Besides STRAWBERRIES the key ingredient is ULTRA GEL. It is AMAZING!!! It’s a thickener which doesn’t need to be cooked to thicken and it is virtually tasteless. This allows the fresh berries to be the star. The jam doesn’t need sugar to thicken it so you pick how sweet you make it and what type of sweetener you use. It makes FANTASTIC freezer jam as a result.
The recipe I use is adapted from the Basic Freezer Jam recipe in Carma Christensen and Janet Stocks' book The Ultra Gel Answer Book.

1) WASH, RINSE & DRAIN strawberries.
I use water and vinegar to wash strawberries. I give them a few minutes to sit after swishing them around and then put them in a strainer where I rinse them with water and let them drain.
2) CORE & QUARTER strawberries.
A cutting board & butter knife work great for this step making this a younger children friendly activity.
3) PUREE WET INGREDIENTS: ADD ¼ c. lemon juice to the blender and then ADD strawberries. Add strawberries until the puree reaches the 4 c. mark.
My blender has a difficult time pureeing strawberries without much liquid so I puree a few strawberries at a time until I get a cup or so of liquid and then I add the bulk of my strawberries. For chunkier jam you could blend in batches or cut some by hand. Our family it happy with smooth jam.


4) MIX DRY INGREDIENTS: 1 c. sugar & ½ c. Ultra Gel. Mix WELL! Unmixed Ultra Gel can clump.
NOTE: After my main mixing bowl has been used once to mix dry and wet ingredients, I mix the dry ingredients for following batches in a new separate dry bowl. For the following batches I also pour the mixed dry ingredients on top of the wet ingredients in the main mixing bowl for step 5.
5) MIX the DRY ingredients and the WET ingredients well. Use a whisk and spatula to mix and scrape the sides and bottom of the bowl.

Mix until you can’t feel the sugar anymore when you stir. Let it sit for a few minutes before the next step. (My favorite mixing bowl has a pouring spout making it easy to fill jars with just a spatula. I didn't use it here. I was teaching some young friends how to make jam and it would have been too heavy for them to lift.)
⇒THIS IS A GREAT TIME TO TASTE YOUR FIRST BATCH and adjust your ingredients For several years we grew our own strawberries and many of those years our strawberries were so YUMMY we reduced the sugar to ½ c or less and even reduced the amount of Ultra Gel used to thicken it. This year we needed the whole cup of sugar and it's still not that sweet.
Since moving we are missing OUR home grown STRAWBERRIES!!!

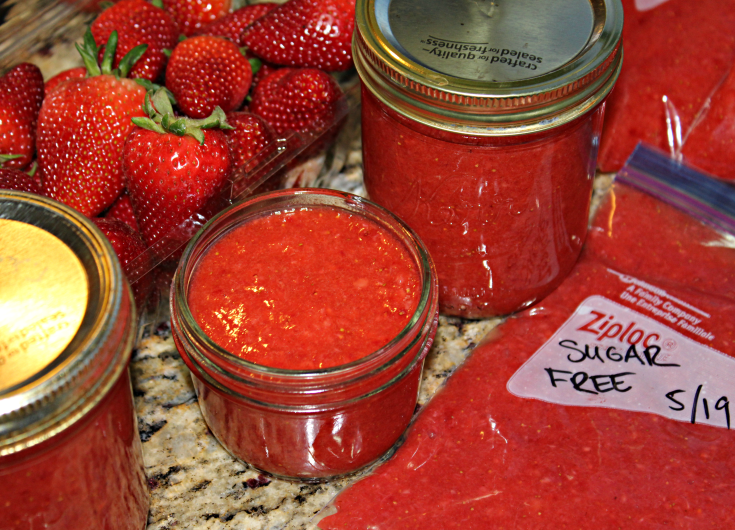
6) FILL clean freezer safe jars & FREEZE.
Freezer safe jars are jars with straight sides that won’t break when the liquid inside freezes and expands. Canning jar manufacturers make special jars for freezing. My favorite jar for freezer jam is a recycled bouillon jar. It narrows slightly at the top so I stop filling a ¼” before I get to that point and don’t fill it completely.
FREEZER BAGS are a convenient alternative to freezer safe jars. My daughter and I made jam and she opted to use them. I have used them in the past when I didn't have enough jars or when freezer space was limited. She used quart freezer bags but filled them with 2 cups of jam. This size makes it easy to defrost a bag, cut the corner out and fill a pint jar for storing in the fridge. Freeze jam in the amounts you will eat in a couple of weeks so you don't waste any.

⇒THE SUGAR-FREE version in the feature picture used 2 tsp. of STEVIA powder in place of the sugar. Gradually stir in the Ultra Gel and stevia mixture into the wet ingredients a little at a time to keep it from clumping.
This is a GREAT PROJECT for YOUNGER children.
The STEPS are straight forward and simple. They get to play in water to wash the berries and then get to use a cutting board and butter knife to cut the berry in half and half again then cut off the green stem. If you have the patience to teach them and let go of the fact that you may be wasting some of the berry when the green end gets cut off you will be REWARDED with FABULOUS jam and CONFIDENT children AND they get more skilled every year! You could extend the process out over a couple of days by putting the berries in the fridge between steps. AND you could bypass the blender and use potato mashers to puree the berries. It can be a very rewarding process for both YOUNG and OLD!
Just to give you an idea of how fast this can go, 4 people (2 young first timers) turned 12 lbs. of strawberries into freezer jam in about 1 1/2 hrs. Once the berries were washed and cut it quickly became a 2 person job (the 2 young first timers finished it up). That said it can still easily be done by just one person. It's just a PROCESS with steps!
I invite you to take advantage of this season of strawberries and REWARD yourself by trying something NEW and making some FAST, EASY & DELICIOUS strawberry freezer jam.