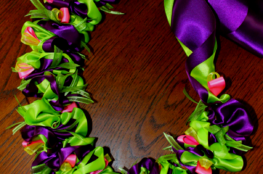
RIBBON LEIS are the perfect gift for MANY occasions. In our family they have become a GRADUATION GIFT.
Leis can be created with so many things; fresh flowers, silk flowers, greenery, nuts, candy, shells, seeds, money, yarn are just a few of the things I have seen them made with. There is no ONE WAY to create a lei.
Sometimes you just have to FIGURE OUT what works for you.
As I said in an earlier post I made a ribbon leis for a daughter 2 years ago with 1 ½” ribbon and when I tried using that same technique with the 2 ¼” ribbon I got this time it just wouldn’t work. After some experimenting I FIGURED OUT a way to make a GREAT looking lei with the thicker ribbon AND it's much faster to create than my previous ribbon lei with the narrower ribbon.
♥I have to give a SHOUT OUT to ORGANZABAG on Ebay for great customer service, a GREAT selection of RIBBONS and SUPER FAST FREE SHIPPING! THANK YOU!!!! I am not getting anything for this... I was just super PLEASED with their prices and service and think you will be too!
SUPPLIES:
⋅17 yds Double Faced (also know as "double sided") Satin Ribbon 2 ¼” wide (makes approx.a 32-34" leis)
⋅Additional Double Faced Ribbons for customizing. Vary ribbon size(⅛”, ¼”, 5/8",1”) type for interest (sheer/organza/printed/ombre) Next week's post.
⋅Heavy Duty Thread (upholstery is good. I use a thicker topstitching thread I have for denim)
⋅Long Doll Needle (a regular hand sewing needle can work, it’s just NOT as easy)
⋅Marking Utensil: pencil, washable marker, chalk
⋅Ruler (making a JIG is the easiest)
⋅Scissors/Rotary Cutter
⋅Optional: Beeswax, small end weight like a clothes pin or spool
NOTE: After making a few more leis and trying to keep better track of their final length and the amount of ribbon used I've come to the conclusion that 17 yards of ribbon makes about a 32-34" lei. This can still vary on how tightly you compact your ribbon on the thread and the thickness of all the things you are adding in. It's more like 20+ yard for a 36" lei. If you have bought exactly 17 yards and want a longer lei you still have options; don't compact the ribbon as much and/or leave longer ties and let the ties make up some of the length.
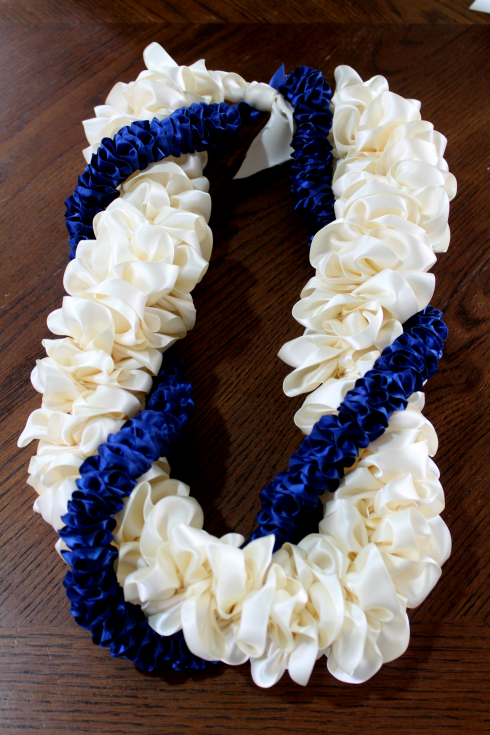
BASIC ONE COLOR RIBBON LEI INSTRUCTIONS
(Just the ivory base lei in the above picture.)
⇒ THREAD your needle. Total length of doubled over thread should be at least 12” longer than you want your finished leis. I've just found having too much is way better than being short at the end. You don’t need it all at once so winding it on a clothespin is helpful. I run beeswax over my thread just to make it stronger. (If you are experimenting and plan to take your stitches out and try something else don’t use the beewax because it leaves marks in the ribbon.)


⇒MAKE A JIG for marking base ribbon.
⇒ MARK base ribbon. SKIP the first 6”(this is will be used to tie the two ends of the finished lei together) then mark the ribbon every 3” alternating edges of the ribbon. You will be creating a zigzag pattern. It is very important that the pattern is kept or your marks will show on the outer edge of the leis. I know from SAD experience! =(
⇒TAPE a clean bag to your table to catch your ribbon as you mark it. My jig was 2’ long and I tallied the number of times I stretch out the ribbon to mark it. You want to mark the total length (16 yds +2 ft) at one time. It is a HUGE time saver! Re-rolling the ribbon back on the spool after it's marked makes it easier to handle.


⇒STITCH using large ⅜” to ⅝” stitches. Start at your first edge mark and stitch across to your second mark in a straight line. (It's a bit difficult to see...SORRY!)
NOTE:Stitch from one side...keep your marked side up and end with your needle coming up and out at your marks. ALSO a good way to keep your stitches somewhat uniform is to count them.
REPEAT this zigzag stitching pattern. Slide the ribbon down your thread. As it bunches, twist it to create a spiral or just a back and forth pattern. If you have used a clothespin let more thread out as needed.

Beginning knot.
⇒IT'S DONE when you’ve reached the length you want with it bunched. Secure knots. The beginning knot is just a simple 2 threads rolled around my finger knot. I thread the ribbon through the middle of it so it can't pull through. Measure out 6” for a tie and cut your ribbon on an angle to keep it from fraying.

End knot.
This is getting LONG so I will continue with CUSTOMIZING next week...BUT I won't leave you completely HANGING.
ORDER your ribbon! Be sure to check out ORGANZABAG on eBay before you buy anywhere else...I was GLAD I did!
BELOW are 3 leis with the size and approximate amounts of ribbons used to make them. It can give you some IDEAS of what you might want ORDER.

17 yds 2 1/4" Double Faced Satin Ribbon (IVORY)
17 yds 5/8" Double Faced Ribbon (BLUE)

17 yd. 2 1/4" Double Faced Satin Ribbon (IVORY)
12 yds. 1/4" Double Faced Satin Ribbon (ORANGE)
12 yds. 1/8" Double Faced Satin Ribbon (BLACK)